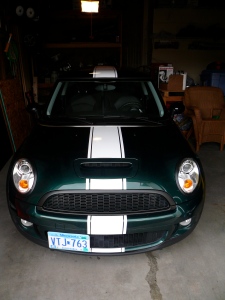
There are a lot of guides online for applying vinyl stripes/decals to cars, but I still found myself making up some aspects as I went along. So, I cannot declare this is the RIGHT way to do things, but this is how I did it. If you have better approaches please let me know in the comments.
First, I had to get the mini naked. The factory stripes and invisible bra had to go.

The heat gun on low heat made quick work of stripes. I was actually pretty amazed at how readily they pulled off, with how ‘stuck’ they seem during normal car-washing etc. They didn’t leave too much film on the car either. The invisible bra was a bit tougher.. it pulled off OK with the heat gun, but left a terrible mess of adhesive behind. After pulling everything off I went and hand washed it prior to using goo-gone to remove the left behind adhesive. I didn’t want any grit to get rubbed in when i was scrubbing away at the adhesive.

Doesn’t look too bad naked. I had to pull off the mini logo which took a bit of finessing as well. I didn’t take pictures of the front removal, but have some from the rear.
 I read somewhere the dental floss works pretty well cutting the adhesive, and it does. I went through quite a bit as it breaks a lot. There are two posts behind the round part, and I sawed all the way around with floss. It was still pretty stuck at that point, so I worked two zip ties in and used them as handles of sorts to pull it of. It was troubling becuase you have to pull HARD.


I’ll admit I was excited to get started, but like more things you are better off getting all the prep work done. In this case I wanted to show you some problems i had with the stripes I purchased off ebay. They came in three pieces – Bonnet, Roof, and Boot. In hindsight i should have verified they were all exactly the same, because as you can see in the photos they weren’t. In addition to checking out your supplies make sure there are NO bumps in the finish. I noticed a sap spot on the hood and didn’t take the time to clean it off properly. Trust me, the vinyl will only exacerbate any bumps in your finish.
I started on the boot as I figured that would be the least visible place to start. Don’t do that. The compound curves are probably the most challenging part on the whole car. I would start on the roof, then hood, then boot. I didn’t take pictures of my approach to centering the stripes. But basically I would put masking tape on the trim, window, plastic or whatnot bracketing both ends of the area I was working on. I would then measure in from the sides of the hood, trunk, roof to find the center. I would mark that on the masking tape then measure out 1/2 the width of my stripe each way and mark the edges. I would then align the stripe to these marks. The centering was surprisingly easy.
Applying the vinyl was easy too, you can read any number of posts to describe the soapy water mix etc. What took me an hour and a half of frustration to learn was the proper squeegee technique. I used an old medical insurance card (might as well get some use!) but had a hell of a time getting the vinyl to actually stick. I would squeegee out the water and it would just go ‘loose’ again. I finally figured out to wrap the card in paper towels. This would suck up the water that squeezed out from under the vinyl and make it stick. Without the paper towel the water would just zip back under and make you want to pull your hair out.
Once you have it centered and squegeed you have to trim it. I couldn’t find ANY information on how to do this anywhere. I saw some people would show cutting full body wraps with an x-acto knife on the door lines, but no tips on how to cut to size. So this could be the wrong way, but it’s how I did it. Most of the ends of the stripe were wrap around (ie around bottom of bumper or bonnet) or on the sections of glass roof panels. These were easy, as i just cut them long with scissors for the wrap or cut on the glass with the x-acto. What was stressful was trimming the stripe on the paint with the x-acto. If you cut too hard its right into your finish! This felt somewhat like cooking bacon with no pants on, very dangerous.
 Here is an example of doing that. I made a template of paper, transferred it to cardboard from a cereal box and used it to trip the Stripes. I think it worked pretty well, and hopefully i didn’t damage the finish. Have a better way? Please let me know!
 Overall the project worked out pretty good, although it took me a LOT longer than I had anticipated. I probably spent 5 hours on the application, not counting the removal which I had done a few weeks prior. I left the mini logos off as i thought it looked cleaner. The stripes cover up the holes the badges had left behind pretty well. I also moved my license plate as I couldn’t bring myself to put it back in its original spot. I’ll make another post showing how I went about that.
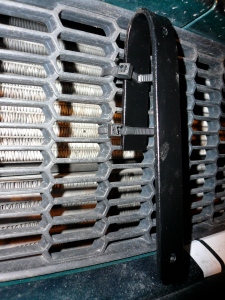
 To mount them I purchased some sweet stainless bolts, nuts, washers as well as rubber washers. I didn’t want any rust to form and I generally have a tendency to do things ‘right’ – even if it takes longer and costs more. You’ll soon see how I fell off that straight and narrow path… So my plan was run a bolt through the bracket then go fender washer | rubber washer | grill | rubber washer | fender washer| bolt. The problem I quickly ran into was it is IMPOSSIBLE to reach around behind the lower grill. The intercooler is right up in there. I even had a few failed attempts at installing them with needle nose pliers using a ship-in-the-bottle approach. I read up on removing the lower grill, but that seemed too involved for this project – I’ll save that for the rally light install.
 So abandoning that approach, I screwed in the left one as the holes are not cut out way on the left. The right one is mounted a bit more ‘GHETTO’.
 Yup, that’s right. Zip ties. How embarrassing. They actually hold pretty well all things said.
 At this point I just need to order up a nice black powder-coat license frame to finish it up. Otherwise good to go, until those rally lights go in.


